PLA Spring Motor Windup Helicopter

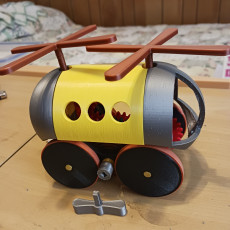


PLA Spring Motor Windup Helicopter
Published 2017-03-27T18:41:46+00:00
How better to "wind up" the helicopter series than with a Windup Helicopter!
All components, including the spring, are printed in PLA.
Video of prototype is here: https://youtu.be/fXo1cwoLAJE.
Designed using Sketchup Make 2015, and printed in PLA on a Makerbot Replicator 2 using Makerware 2.3.3.42 "Standard" Settings (.2mm layer height, 2 shells, 10% infill).


When printing "Chassis.stl", "Nose.stl", "Fuselage.stl" and "Tail.stl", supports may be required depending on your printer and printer settings. My prototypes printed fine without supports.
Print "Key.stl", "Spring.stl" and "Axle Spring.stl" with 100% infill, remaining parts with 10% infill.
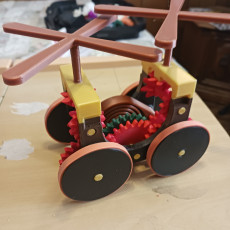
Study "Assembly.skp" or "Assembly.stl".
Print all pieces as shown in "Assembly.skp" or "Assembly.stl". Supports are optional, depending on your printer and settings, for printing "Chassis.stl", "Nose.stl", "Fuselage.stl" and "Tail.stl". My prototypes printed fine without supports. Print "Key.stl", "Spring.stl" and "Axle Spring.stl" with 100% infill, remaining parts with 10% infill.
Test fit and trim, file, sand, etc. all parts as necessary for smooth movement of moving surfaces, and tight fit for non moving surfaces. Depending on the colors you chose and your printer settings, more or less trimming, filing and/or sanding will be required.
Place wide rubber bands around the circumference of all wheels for traction.
Assemble as shown in "Assembly.skp" or "Assembly.stl". Start by assembling the entire chassis except for the rotors, their gears and the body parts ("Nose.stl", "Fuselage.stl" and "Tail.stl"). Next, attach "Fuselage.stl" onto "Chassis.stl", then add the rotors and their gears, and finally, attach "Nose.stl" and "Tail.stl" onto "Chassis.stl".
Apply light machine oil on the moving parts.
Once fully assembled, tested and aligned, a small dot of thick cyanoacrylate glue between the gears and axles will aid in holding the gears in position.
If you desire a more "grandkid / youngster" proof toy, I recommend printing the rotors and axles at 100% infill.
Feel free to comment if you have questions.
Hope you like it!
| Date published | 27/03/2017 |
| Tecnología | FDM |


Got it all done and it actually works!! My Ender 5 is tuned as close as it could be and I've printed a ton of stuff but some of the parts here were not very close to fitting. I had to resize a couple and do some major sanding/grinding to get a few to fit. When it came to the wind key I gave up trying to size it for the hex hole so I made a remix so to speak. I made a piece to glue over the key hole with a square hole instead of hex and printed a key (remixed from the original) to fit perfectly. A lot easier to size if not printed exact. Other wise this was a fun project and thanks for all of the work that went into making it.